Managing Servers
Apporto provides full service for software installation, image creation, and deployment as a part of your subscription. However, if you want to manage these tasks in house, we provide tools that enable you to do so. Contact [email protected] if you’d like us to enable server access.
The Servers screen lets you access servers in the cloud for which you have administrative rights. You can install applications and configure desktops on a selected server, usually a TEST server. Then, you may create an image and deploy it to the production server farm.
This short guide will show you how to:
View Servers Screen
Using your preferred web browser, navigate to the URL for your Apporto system, for example, “mycompany.apporto.com”, and log in to the system using your credentials.
Click the Servers ![]() icon in the Navigation Panel.
icon in the Navigation Panel.
The ‘Servers’ screen displays.

The servers list provides the following information:
-
LOCAL NAME: User-defined name of the server (editable field)
-
SERVER NAME: The unique name for the server (read only)
-
STATE: The current operational state of the server (stopped, starting, or running)
-
IMAGE DATE: The date when the last image was created (blank if an image has not yet been created)
Start Server
To start a server, go to the ACTIONS menu and click Start.
Wait about 30 seconds (AWS) to 2 minutes (Azure) for the server to start.
When the server is running, the ACTIONS menu option will provide an option to Launch the Server.
Create an Image
Find the desired TEST server, go to the ACTIONS menu and click Launch. The desktop opens in a new browser tab.
You can install software and configure the desktop. Common changes include installing software, adding desktop shortcuts, changing the time zone, and setting the default browser and/or landing page.
![]()
You must have Windows Administrative permissions in order to make changes. Contact [email protected] to set this up.
When you have completed configuring the desktop, you may create a base image and deploy it to the production servers.
To create a base image, locate the relevant TEST server and select Create Image in the ACTIONS menu.

A confirmation dialog displays. Image creation typically takes about 30 minutes (AWS) or up to 2 hours (Azure) depending on the image size. You may not start or launch the TEST server during this time.
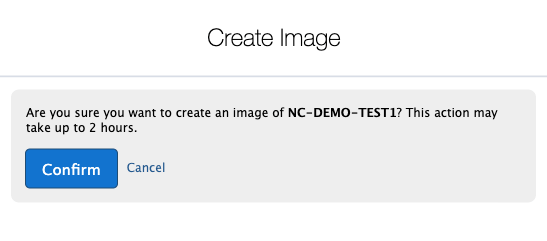
Click Confirm to proceed.
A notification displays when the image creation process starts and completes. Click the bell icon ![]() to view notifications.
to view notifications.
Email notifications are also sent when the image creation process starts and completes.

When the image has been created, a new date and time will display in the IMAGE DATE column.
![]()
Only one image is stored (the most recent one).
Deploy an Image
After creating an image, you may deploy (replicate) it to production servers.
Deployment typically takes 30 minutes to 1 hour, depending on the size of the farm. The base image is replicated to up to 5 servers simultaneously. If the farm has 20 servers, the image is deployed to the first 5 servers, then to the next 5, and so on.
To initiate immediate deployment, find the desired TEST server, go to the ACTIONS menu and click Deploy Image Now.
To schedule deployment for a later time, find the desired TEST server, go to the ACTIONS menu and click Schedule Deployment.
The ‘Calendar’ opens.

Scroll to the desired date, then double click in the cell to select a time. Outages are scheduled in 1 hour blocks.
A ‘Deploy Image’ dialog displays.
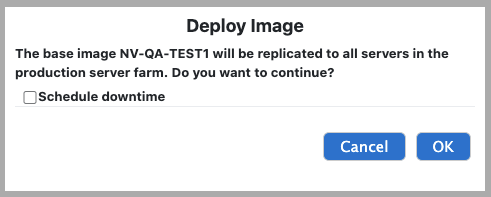
Check the Schedule downtime checkbox if you want users to see a series of three warning messages in the desktop. The messages warn users at 30, 10, and 5 minutes prior to the outage so they have time to finish and save their work. Servers are stopped and active sessions are ended when the deployment starts.
Click OK to proceed.
The calendar will refresh to show your scheduled event and a success message.
The page refreshes to take you back to the Servers screen.
System notifications display at the start and end of the deployment process.
Click on the bell icon ![]() to view notifications.
to view notifications.
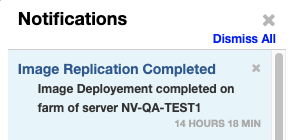
Email notifications are also sent when the deployment process starts and completes.

When deployment finishes, you can confirm that production servers have been updated successfully by navigating to the Servers screen, locating and launching one or more of the production servers.
Contact [email protected] if you encounter any issues or may need to rollback changes.
Cancel or Reschedule Downtime
Click on the Calendar icon ![]() in the left menu.
in the left menu.
The ‘Calendar’ displays.
Click on the Maintenance tab.
Scroll to the date and time when the event is scheduled for.
To cancel an event, click x in the event box.
To reschedule an event, drag and drop it to a new time.
The calendar will refresh to show your changes.
Backup and Restore a Base Image
To backup the base image, locate the relevant base image server and select Backup from the ACTIONS menu.
To restore the image to the last backed up version, select Restore
In each case a confirmation displays to warn you that these processes can take up to 2 hours.
![]() Restoring an image restores it to the most recent backed up image.
Restoring an image restores it to the most recent backed up image.
![]() Re-imaging a VM will remove the current image and replace it with the Base Image (also known as the “Golden Image”).
Re-imaging a VM will remove the current image and replace it with the Base Image (also known as the “Golden Image”).