Managing resource hubs
Resource hubs provide the ability to transform desktop screens into browser views, upload and download files, and balance the load of multiple user sessions.
Use the information in this guide to learn how to:
- View the resource hub list
- Edit a resource hub
You may also visit the related article on creating a resource hub.
View the resource hub list

The Resource hubs page shows a list of all the resource groups in your Apporto instance. To access this page, follow the steps below.
- Log in to the system using your credentials.
- Click resource hubs or the
 icon in the navigation panel.
To make it easier to locate the appropriate resource hub, you may adjust the visible columns or filter or search through the list. See the article on working with lists for more information.
Edit a resource hub

Once a resource hub profile has been created, the Create resource hub screen will refresh as the Edit resource hub screen and the appropriate tabs for the selected hub type will unlock for editing.
If you are not being redirected from the create screen, click on a row’s edit button from the Resource hubs list to trigger the Edit resource hub page. Update any necessary values and then click save changes to submit.
- Profile
- Provider
- Hyperstream
- Filestores
- RDP load balancer (cloud)
- RDP management gateway (on-prem)
- Service account (on-prem)
Edit the resource hub profile
The first part of the resource hub configuration is the profile section.

The table below shows the values that make up a resource hub profile.
| Field | Datatype | Required? | Notes |
|---|---|---|---|
| Name | String | Yes | |
| Description | String | No | |
| Hub type | Lookup value | Yes |
|
| Resource hub active (status) | Boolean | No |
To update the resource hub profile, follow the steps below:
- Change one or more profile values in the form.
- Click/tap save changes to update the record.
Update the providers
At the bottom of the Edit resource hub page, you can configure select your virtualization provider(s).
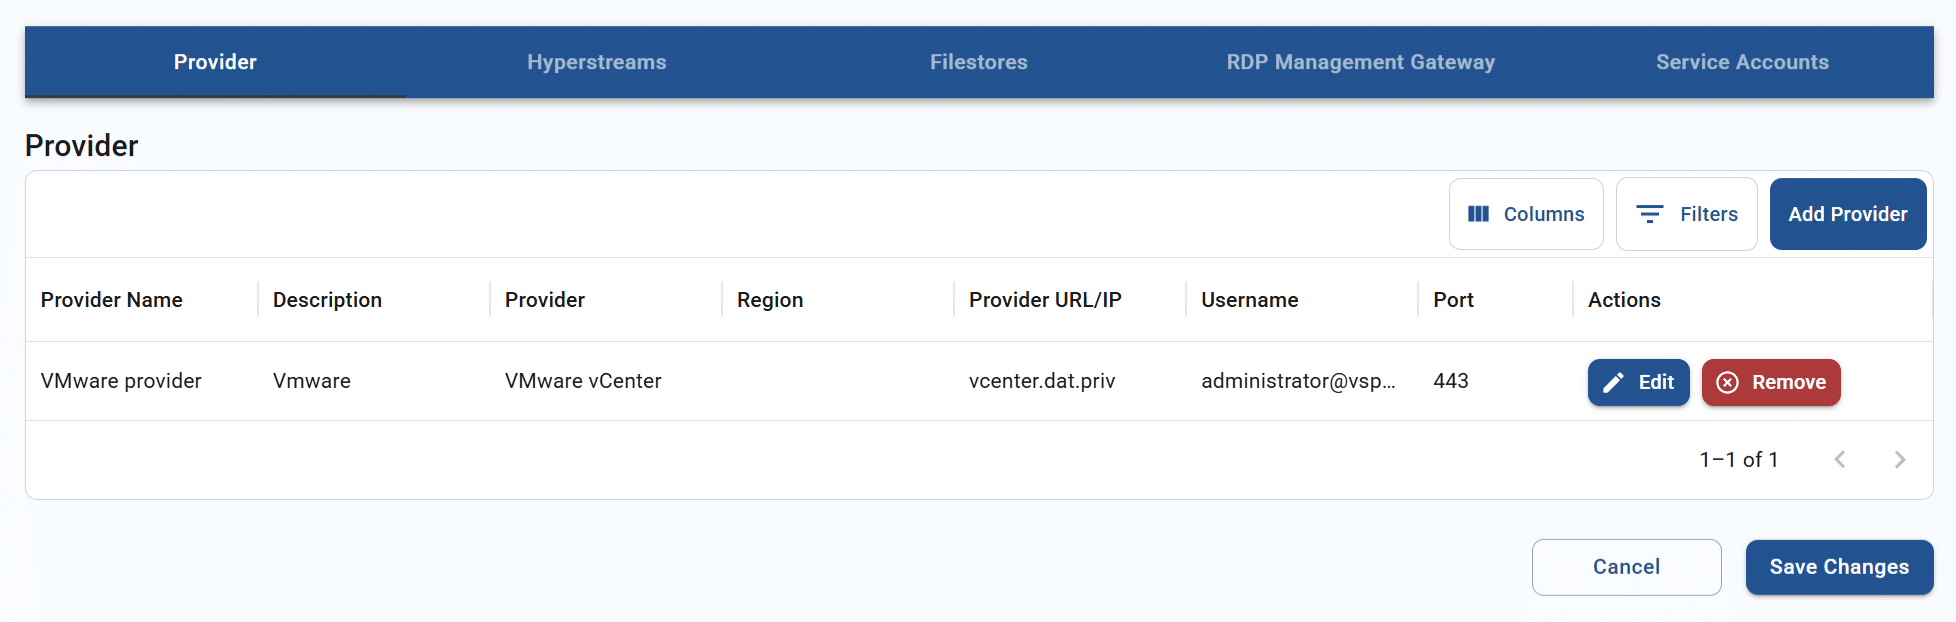
Add a provider
You may have multiple virtualization providers for the same resource hub. To add a provider, follow the steps below:
- From the “Provider” section, click add provider.
- The system will display the Add new provider instance pop-up.
Cloud-based hubs must also be tied to a region.

On-prem hubs prompt for additional provider information.
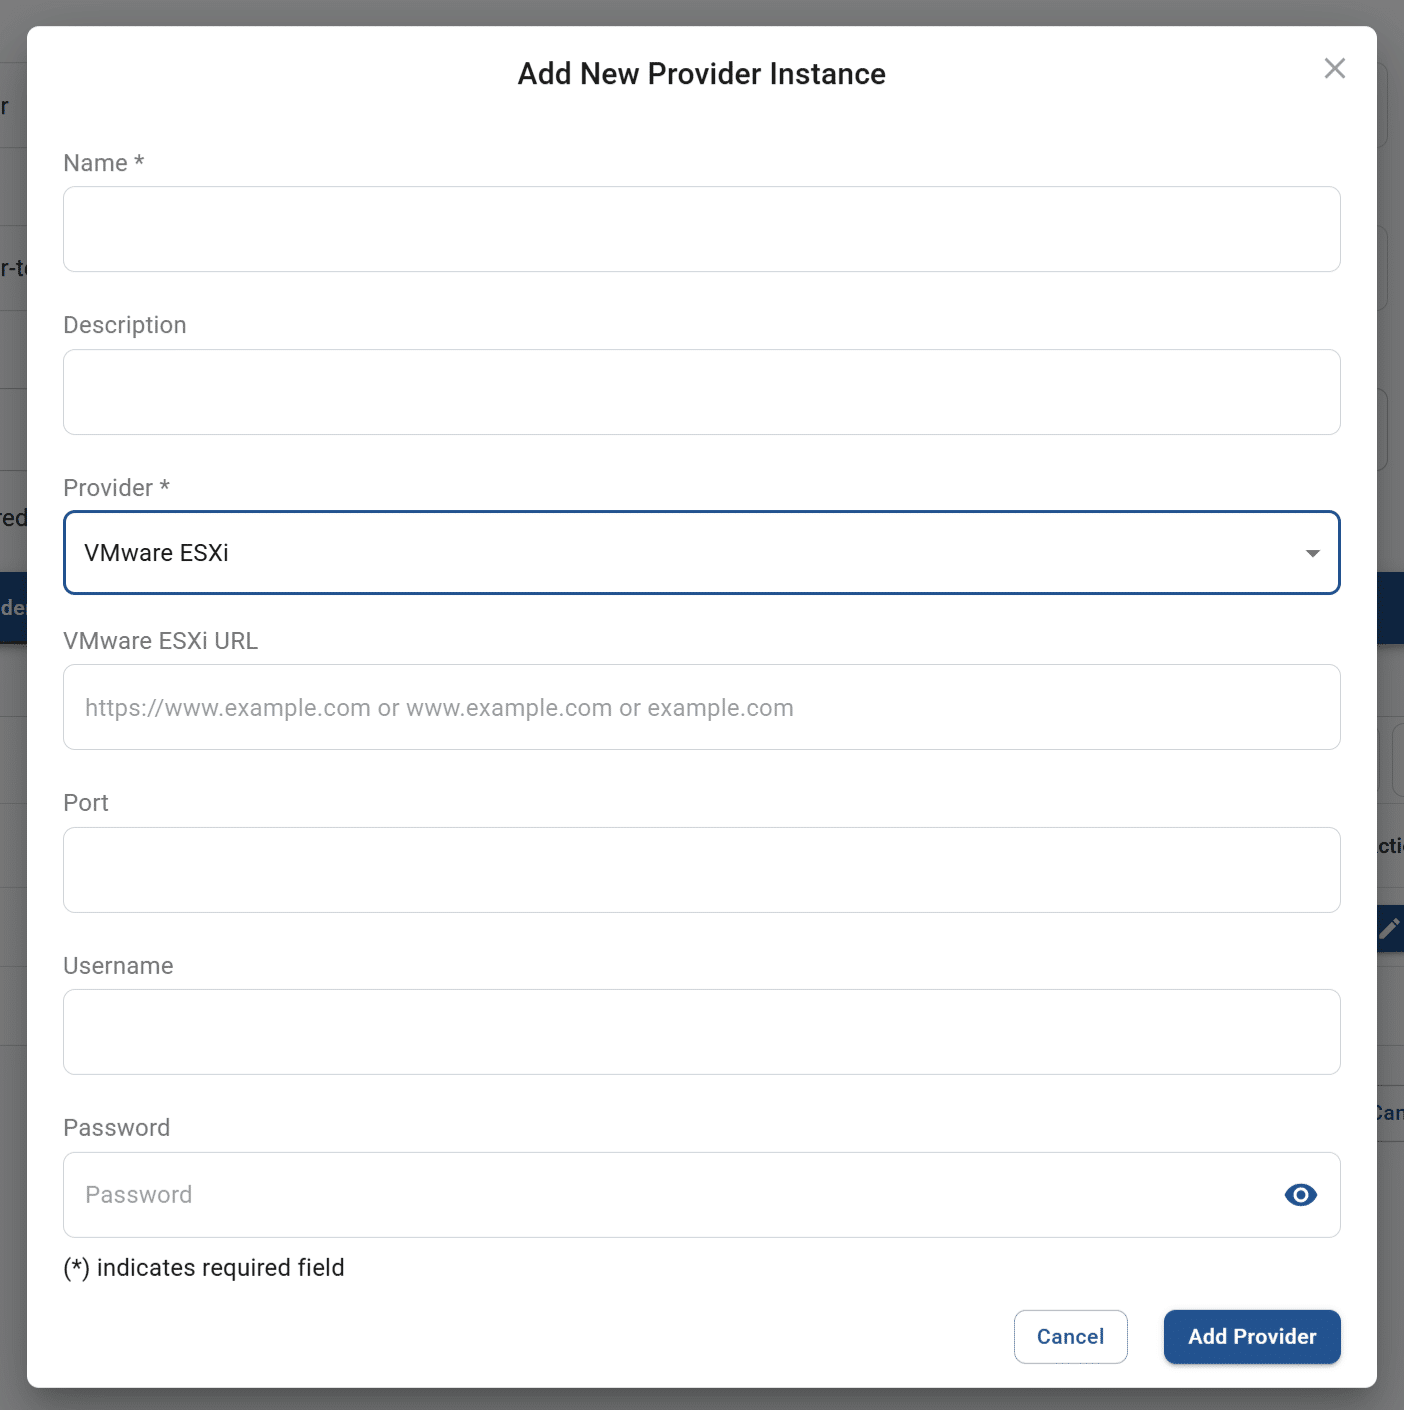
- Enter the necessary values. The table below shows the values that make up a provider record.
Field Datatype Required? Notes Name String Yes A user-friendly name for the provider Description String No Any meaningful description that helps describe this provider Provider Lookup value Yes - Visible if selected hub type = on-prem:
- Hyper-V
- Nutanix Prism Central
- Nutanix Prism Element
- Proxmox
- Self-managed
- VMware ESXi
- VMware vCenter
- Visible if selected hub type = Apporto or customer cloud:
- AWS
- Azure
Cloud region Lookup value Conditional Visible if selected hub type = cloud & options are dependent on cloud selection: - AWS
- Canada Central
- Canada West
- Dubai
- Germany
- Hong Kong
- Ireland
- London
- Mumbai
- Northern California
- Northern Virginia
- Ohio
- Oregon
- Paris
- Azure
- Dubai
- East US
- Germany
- London
- North Central US
- South Central US
- West US
Hyper-V IP String No Visible if provider = Hyper-V Nutanix Prism Central IP String No Visible if provider = Nutanix Prism Central Nutanix Prism Element IP String No Visible if provider = Nutanix Prism Element Proxmox IP String No Visible if provider = Proxmox VMware ESXi URL String No Visible if provider = VMware ESXi VMware vCenter URL String No Visible if provider = VMware vCenter Port String No Visible for all on-prem providers except self-managed Username String No Visible for all on-prem providers except self-managed Password String No Visible for all on-prem providers except self-managed - Visible if selected hub type = on-prem:
- Click add provider. The system will close the pop-up.
- The newly created provider profile will display in the tab. Click save changes to confirm.
Edit a provider
At times, you may need to update the settings for an on-prem or cloud provider. To edit a provider, follow the steps below:
- From the “Provider” section, click edit on an existing provider record.
- The system will display the Edit provider instance pop-up.

- Update the necessary values. See the table in the section above for descriptions of each available value.
- Click update provider. The system will close the pop-up.
- The updated provider will display in the tab. Click save changes to confirm.
Remove a provider
If a virtualization provider in your list is no longer applicable, it should be removed from the resource hub. To remove a provider, follow the steps below:
- From the “Provider” tab, click remove on a row in the list.
- The system will display the Delete provider pop-up.

- Click confirm to complete deletion. The former provider record will no longer be visible in the tab.
Update the hyperstream
At the bottom of the Edit resource hub page, you may view the hyperstream configuration for the resource hub. A maximum of one hyperstream can be configured for the resource hub at a time.

To update the hyperstream, follow the steps below:
- Replace the hyperstream
- From the “Hyperstream” section, click remove to delete the existing hyperstream record. The system will display the Delete hyperstream pop-up.

- Click confirm to complete deletion. The former hyperstream record will no longer be visible in the tab.
- Click add hyperstream to create a new record. The system will display the Add new hyperstream pop-up.

- Enter the necessary values. The table below shows the values that make up a hyperstream record.
Field Datatype Required? Notes Name String Yes A user-friendly name for the hyperstream service Description String Yes Any meaningful description that helps describe this service Hyperstream load balancer FQDN String Conditional The fully qualified domain name (FQDN) of the load balancer service At least 1 of the 2 FQDN values must be entered.
Route traffic here (hyperstream load balancer FQDN) by default Boolean Conditional If both FQDN values are entered, 1 must be selected as the default. Secure gateway FQDN String Conditional The fully qualified domain name (FQDN) of the secure gateway service At least 1 of the 2 FQDN values must be entered.
Route traffic here (secure gateway FQDN) by default Boolean Conditional If both FQDN values are entered, 1 must be selected as the default. Secret String No The value is used for the payload validation during authentication to on-premise hyperstream deployments. The secret entered here must match the secret stored in the hyperstream services configuration. If not specified, the Apporto default value will be used. - Click add hyperstream. The system will close the pop-up.
- The newly created hyperstream will display in the tab. Click save changes to confirm.
- From the “Hyperstream” section, click remove to delete the existing hyperstream record. The system will display the Delete hyperstream pop-up.
- Edit the hyperstream
- From the “Hyperstreams” section, click edit on the existing hyperstream record.
- The system will display the Edit hyperstream pop-up.

- Update any necessary values. The table above provides descriptions of all available fields.
- Click update hyperstream. The system will close the pop-up.
- The updated values will display in the tab. Click save changes to confirm.
Update the filestore
The third tab in the bottom section displays the filestore that is assigned to the resource hub.

Add a filestore
To add a filestore, follow the steps below:
- From the “Filestore” tab, click add filestore.
- The system will display the Add new filestore pop-up.

- Enter the necessary values. The table below shows the values that make up a filestore record.
Field Datatype Required? Notes Name String Yes Description String No Type Lookup value No - Distributed file system (DFS)
- Network file system (NFS)
FQDN or hostname String Yes - Click add filestore. The system will close the pop-up.
- The newly created filestore will display in the tab. Click save changes to confirm.
Edit a filestore
To edit a filestore, follow the steps below.
- From the “Filestore” tab, click edit on a row in the list.
- The system will display the Edit filestore pop-up.

- Update any necessary values, and click update filestore. The system will close the pop-up.
- The updated values will display in the tab. Click save changes to confirm.
Remove a filestore
To remove a filestore, follow the steps below.
- From the “Filestore” tab, click remove on a row in the list.
- The system will display the Delete filestore pop-up.

- Click confirm to complete deletion. The former filestore record will no longer be visible in the tab.
Update the RDP load balancer (cloud)
The fourth tab for a cloud-based resource hub displays the RDP load balancer configuration for the resource hub. A maximum of one load balancer can be configured for the resource hub at a time.

To update the load balancer, follow the steps below:
- Replace the load balancer
-
- From the “RDP load balancer” section, click remove to delete the existing load balancer record. The system will display the Delete RDP load balancer pop-up.

- Click confirm to complete deletion. The former load balancer record will no longer be visible in the tab.
- Click add RDP load balancer to create a new record. The system will display the Add new RDP load balancer pop-up.

- Enter the necessary values. The table below shows the values that make up a load balancer record.
Field Datatype Required? Notes Name String Yes Description String No FQDN or hostname String Yes - Click add load balancer. The system will close the pop-up.
- The newly created load balancer will display in the tab. Click save changes to confirm.
- From the “RDP load balancer” section, click remove to delete the existing load balancer record. The system will display the Delete RDP load balancer pop-up.
-
- Edit the load balancer
-
- From the “RDP load balancer” section, click edit on the existing load balancer record.
- The system will display the Edit RDP load balancer pop-up.

- Update any necessary values. The table above provides descriptions of the available fields.
- Click submit. The system will close the pop-up.
- The updated values will display in the tab. Click save changes to confirm.
-
Update the RDP management gateway (on-prem)
The fourth tab for an on-prem resource hub displays the RDP management gateway configuration. This gateway provides security and balances loads.

To update the gateway, follow the steps below:
- Replace the gateway
- From the “RDP management gateway” section, click remove to delete the existing gateway record. The system will display the Delete RDP management gateway pop-up.

- Click confirm to complete deletion. The former gateway record will no longer be visible in the tab.
- Click add RDP management gateway to create a new record. The system will display the Add new RDP management gateway pop-up.

- Enter the necessary values. The table below shows the values that make up a gateway record.
Field Datatype Required? Notes Name String Yes A user-friendly name for the RDP management gateway endpoint Description String No Any meaningful description that helps describe this gateway FQDN or hostname String Yes The FQDN or hostname of the gateway used by this resource hub API key String Yes The API key for the gateway - Click add RDP management gateway. The system will close the pop-up.
- The newly created gateway will display in the tab. Click save changes to confirm.
- From the “RDP management gateway” section, click remove to delete the existing gateway record. The system will display the Delete RDP management gateway pop-up.
- Edit the gateway
- From the “RDP management gateway” section, click edit on the existing gateway record.
- The system will display the Edit RDP management gateway pop-up.

- Update any necessary values. The table above provides descriptions of the available fields.
- Click update RDP management gateway. The system will close the pop-up.
- The updated values will display in the tab. Click save changes to confirm.
Update the service account (on-prem)
The fifth tab for an on-prem resource hub displays the list of available service accounts. For information on how to create service accounts for your instance, see the article on hybrid resource management.
To update the selected service account, follow the steps below:
- From the “Service accounts” section, toggle the desired account ON. Any previously selected account will now be turned off.
- Click save changes to confirm. The newly selected service account will be used on future system transactions.